
November 13, 2006
Working with Dual Layer Media
By Brian Gary
The latest iteration of the Macbook Pros returned dual layer burning to the 15 inch portable (the 17 inch MBP had a DL SuperDrive from launch). The new Mac Pros are shipping with two dual layer burners so there's never been a better time to access double the space on DVD discs. DVD media comes in two basic sizes, DVD-5 and DVD-9, and two basic forms-DVD-R and DVD+R. The more exotic forms, such as DVD 10s and DVD 18, are two-sided combinations of the basic DVD media. The main distinction between DVD-5s and DVD-9s is storage capacity. However, a lot of confusion surrounds this very simple distinction.On the label, DVD-5s display their capacity as 4.7 gigabytes, but when you burn a DVD-5 on your Mac, it can only contain 4.3 gigabytes of data. Many rumors have floated around the Internet regarding this discrepancy, including my favorite: the discs were supposed to be 4.7 gigs, but the manufacturer screwed up and, since they had already printed the labels, they just decided to leave it. And just decided to keep on leaving it too, I guess.
The truth of the matter is that both capacities - 4.7 gigabytes and 4.3 gigabytes (strictly speaking, the actual capacity is between 4.3 and 4.4 gigabytes)--are correct. The discrepancy arises in how those numbers are derived. DVD manufacturers of both single- and dual-layer media use a decimal byte system in which 1000 bytes equal a kilobyte. Hard drives and operating systems (such as Mac OS X) use a binary numbering system in which 1024 bytes equal a kilobyte. When spread over a couple of kilobytes, that difference is negligible; but as you increase the kilobytes, the difference snowballs. In the four gigabyte range, the difference between decimal and binary calculation equals over 300 megabytes of data that the label says you can access, but your Mac says you can't.
It's important to note that DVD Studio Pro uses the 1000 bytes per kilobyte system when estimating disc capacities.
If you format your DVD to an image file and then use either Toast or Disk Utility to burn the DVD your break point will be arbitrarily set because those utilities cannot read the Layout File created by DVDSP during formatting. To ensure proper placement, burn to DVD from within DVDSP.
This article covers the use of dual-layer media for Dual Layer DVDs, as well as using Dual Layer DVD-ROMs for data storage. Dual-layer media is just that: two layers of the recording dye, each backed by a semitransparent metal reflector and separated by a polycarbonate spacer. The top layer is called Layer 0 and the inner layer is called Layer 1. The lasers on both the burners and players have to refocus when switching from the outer to inner layer. On DVD-ROMs, jumping from one layer to the other is a non-issue; but with DVDs a layer change can cause problems with playback.
First and foremost, you need to have a drive that's capable of burning dual-layer media. The new Mac Pros and the very latest MacBook Pro ship with Dual Layer SuperDrives. If your Mac doesn't have an internal drive, it's not a problem as long as you have a Firewire or USB port, because many external drives are available. When shopping for a drive you will want to look for dual-layer information in the drive's specs, such as: DVD+/-R/RW, Dual Layer +/-R DL, CDR/RW
I recommend the Pioneer 111D that can be found as a bare drive or in an external Firewire enclosure. The drive is reliable and I have found it produces very few coasters. Even though dual-layer media keeps coming down in price, it's still not cheap enough to waste half a pack on bad burns.
Even with a reliable drive, it's critical to start with good quality media. I really can't stress that enough. You may see no-name, non-branded media offered at great prices; but if you factor in the "coaster percentage" for inferior media, it most likely will end up costing you more. This is one of those instances where name brands do matter: Verbatim, Sony, Maxell, etc. make high-quality media. If you want to find out who makes your favorite brand and how it stacks up to others, check out digitalFAQ.com.
Finally, you need to consider burn speed. The speed ratings on dual-layer media are much lower than single layer speed ratings. For example, dual-layer might burn at 8x and single-layer at 16x. Even so, the question remains: Should you burn at the maximum speed? Well, if the quality and integrity of the burned media is paramount, the short answer is that you should burn at the slowest speed your device will allow-for most dual layer drives that speed is either 1x or 2x.
Authoring Dual Layer DVDs in DVD Studio Pro
As with so much of the encoding process, creating a dual-layer disc requires the marriage of science and art, combined with the kind of trial-and-error experience that causes many sleepless nights and gray hairs when a deadline looms. The problems are particularly complex when authoring DVD-9s because each time you create a new disc all of the assets are different. Therefore, what worked in the last project won't necessarily work in the new one.The biggest challenge when authoring a Dual Layer DVD is where to set the break point: the point where the player's laser goes from Layer 0 to Layer 1. The process for setting the point in DVD Studio Pro is fairly straightforward; but defining the exact point in the movie where the break should occur is not. Each movie is unique, each disc is an island, and you generally will have to make the determination on a case-by-case basis; but, for the purposes of this article, let's examine two possible scenarios:
A. A single movie with bonus features, etc. (a typical Hollywood release)
B. A disc that has multiple self-contained features.For both examples, assume that all the combined assets (video, audio, menus, DVD-ROM content, etc.) will fit on a single DVD-9 (8.5 gigabytes).
Steps for Setting the Break Point1. With your authoring complete, select the Disc from the Outline view (Figure 1).
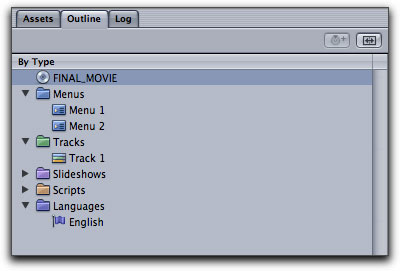
Figure 1
2. In the Inspector, click the Disc/Volume tab and select the Dual radio button from 'Layer Options' (Figure 2).
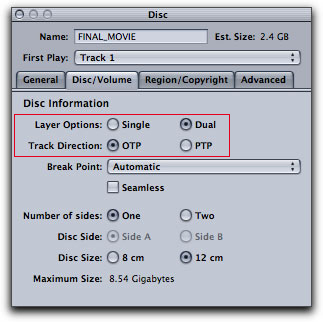
Figure 2
3. Select one of the two Track Direction options: OTP (Opposite Track Path) or PTP (Parallel Track Path). For most projects, you will want to use OTP because when it drops to the inner layer, the laser just moves down from where it stops on Layer 0 and picks up with Layer 1. When you use PTP, the player's laser must go all the way back to the center of the disc (because the DVD layers are read from inside out).4. In most instances, you will want to set the Break Point pop-up menu to Automatic, but as you will see in later steps, the process is not entirely automatic and still requires some intervention on your part.
5. In almost all cases, leave the Seamless checkbox deselected. The majority of DVD players do not support this feature (which is supposed to decrease the pause when the laser moves to Layer 1) and will often stop playback altogether when they reach the break point, if you have used this option.
6. We've now reached the point where the Automatic setting is not so automatic. If you are working on a single movie project similar to Scenario A, open the movie track into the Track Editor by selecting it in the Outline view. You will need to place a marker around the area you would like to have the break point (Figure 3 below) based on the following criteria:
- The break point must be set so that Layer 0 is mostly filled (3.9 gigs capacity per layer).
- The OTP track direction requires that Layer 1 be smaller than Layer 0. The closer the disk reaches maximum capacity, the narrower the acceptable range will become for placing a break point so that Layer 1 is smaller than Layer 0.
- There can be only one break point per disc.
- Break points should occur during black (fade out/in), between scenes (on a cut), or on a static shot. You should avoid having a break during action sequences or during dialog.
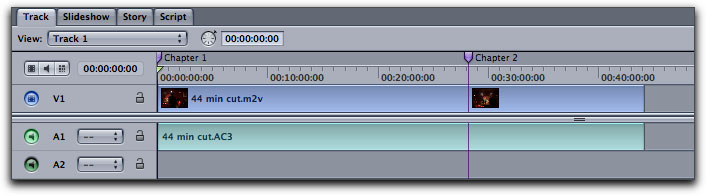
Figure 3 - Here a chapter marker is placed after the halfway point of the track.
Following the criteria is not as easy as it appears because DVDSP will abort the building of the disc and send you back to try again if it doesn't like the marker choice. So, to hedge your bets, place three or four markers around the area you think the break point should be. To make sure your break point markers (a.k.a cell markers) won't interfere with your chapter markers, deselect the Chapter checkbox in the Inspector (Figure 3a) for each one. This will turn the marker green (Figure 3b).
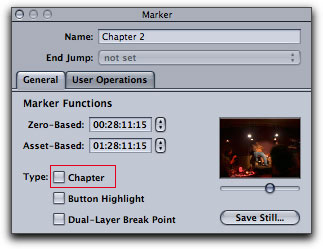
Figure 3a
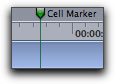
Figure 3b
6A. If you have a disc that's closer to Scenario B (multiple self-contained movies), then it's a bit trickier to pick the break point. Let's say you have three movies, each one 45 minutes in length. Try placing the break point in the black at the end of the second movie, if your bit budgeting will allow it. The goal should be to find a break point that doesn't disrupt playback in any of the movies, but in some cases that may just not be possible.
A note about disc capacity:
The DVD Studio Pro Manual (starting on page 633) has several calculators
to help you determine how much media at given bit rates will fit on each DVD disc format.
7. Click the Build button in the Toolbar (Figure 4) and let DVDSP build your VIDEO_TS file to your hard drive.
Figure 4
8. When the build finishes, choose File > Advanced Burn > Format (or use the keyboard shortcut Command-F) to open the Format window (Figure 5). Then, click the Disc/Volume tab.
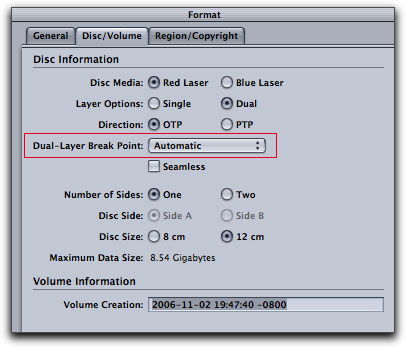
Figure 5
Using the Dual-Layer Break Point pop-up menu, you can select a marker from the list to define it as the break point. DVDSP will only let you choose a valid break point (Figure 5a). If no valid choices are available, then all the markers in the list will be shadowed (Figure 5b). With a break point chosen, you can go ahead and burn a disc.
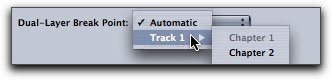
Figure 5a
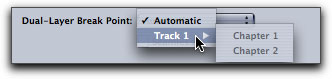
Figure 5b
If you came up empty, you'll have to go back, repeat the above steps, and try a different frame(s) to place the markers.If you're feeling intrepid, you can forego the Automatic settings altogether and manually define the break point. Select the frame you want as the break point; place a marker; and, in the Inspector, deselect the Chapter box and select the Dual-Layer Break Point box (Figure 3). The marker will display a dot in the center indicating that it is now the break point (Figure 6). If you've placed an inappropriate break point, the disc will not build and DVDSP will present you with an error message during the process.
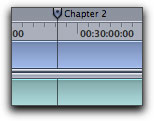
Figure 6
Troubleshooting Dual-Layer DVDsThe biggest problem with testing dual layer discs is that you can only truly test a disc by burning it. Dual-layer break points are committed only when the DVD is formatted onto a dual-layer disc. Emulating the project by using the Simulate feature inside DVDSP or by testing the build via DVD Player on your Mac will not suffice.
You should not format dual-layer projects unattended because, if there are any problems during the build or the formatting process, you will want to be present to respond to DVDSP error messages that will help fix the problem.
If your disc has more DVD-ROM data than movie data, set the Break Point pop-up menu in the Inspector to Automatic and DVDSP will place the break point in the DVD-ROM content.
Dual-layer DVD-R media has some additional quirks inside DVDSP: the media may not appear as a dual-layer disc in the estimation displays, but it will burn correctly. Also, DVDSP will automatically set the break point when Layer 0 is full, regardless of any user-defined break points. Finally, the break point, when using -R media, will be defined as Seamless which may cause incompatibilities with some set top players. Using +R media generally provides more compatible output.
Burned DVD media, especially dual-layer media, can be hit or miss when playing back on set top players. For the greatest compatibility, have your disc replicated by a mass production house.
Dual Layer Discs and iDVD
iDVD 6 lets you create dual-layer DVDs by using DVD-9 media with an internal dual-layer SuperDrive or with an external dual-layer drive connected to your Mac. Just choose Project > Project Info to open the project's properties (see Figure 7) and, from the DVD Type pop-up menu, choose Double Layer (DL) - 7.7 GB. iDVD will set the break point automatically and you can author as you would normally, just with more available space for assets.Why only 7.7 gigabytes? iDVD assumes that you will be using one of the templates and will be inserting content into the drop zones, so it gives itself extra room for those assets.
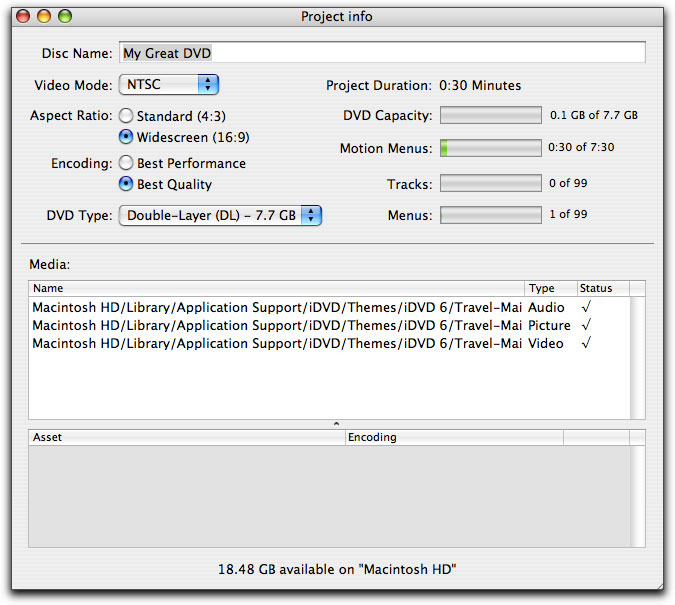
Figure 7
Working with DVD-ROMUsing dual-layer discs for storage or archiving is a much easier proposition. If you have an internal or external dual-layer burner, you can input a blank disc and, in the window that opens (Figure 8), choose Open Finder from the pop-up menu, then click OK.
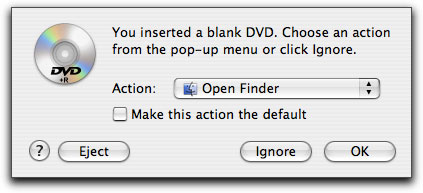
Figure 8
You can then use the Finder's Burn feature to archive up to 8.5 gigabytes of data onto the disc.If you are a .Mac subscriber and use Backup, you can include dual-layer discs into an optical media backup plan by substituting a dual-layer disc for a single-layer disc. Just as when using the Finder's Burn command, Backup will see the extra available space and write to the entire media.
Finally, Roxio's Toast 7 software offers several options for working with dual-layer media, but first you have to make sure to tell Toast that the output disc is dual-layer by choosing DVD-DL from the media pop-up menu (Figure 9).
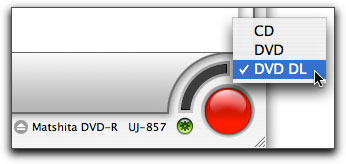
Figure 9
- You can create dual-layer DVDs by either providing raw un-encoded assets or the VIDEO_TS folder if you've already built the DVD. Toast will arbitrarily place the break point when Layer 0 is filled, so the break could happen in the middle of a scene. In terms of DVD authoring, Toast is very stripped down and not comparable with DVDSP; but it does provide an alternative workflow that may be all you require.
- Toast 7 has a spanning feature that will let you burn large amounts of data across multiple discs. For example, you could burn 18 gigabytes of data across three dual layer DVDs (Figure 10). It can also compress the data in order to fit more content on the disc.
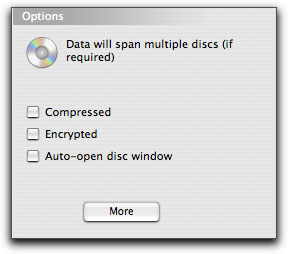
Figure 10
- Toast makes it easy to copy unencrypted dual-layer discs, and can also compress content from an unencrypted dual-layer disc (or VIDEO-TS) onto a single-layer disc.
In closing, the price of dual-layer media has really come down this last year and as an archiving format, it's really quite cost effective. For example, I media managed the final cut of my last DV feature film (90 minutes) into a new Final Cut Pro project with two-second handles and it weighed in at around 20 gigabytes. I used Toast's spanning feature and burned the project to three dual-layer DVDs. I purchase my media in bulk so the cost was less than $5, it takes up very little shelf space and provides an easily accessible version of the final cut that's immediately editable once I copy it back to a hard drive.
Dual Layer DVD's are more of a challenge two work with than single-layer discs, but it does offer double the media capacity for your troubles. The secret is budgeting a little more time for working through the trial and error phase of placing the break point and also realizing that you will have to make a subjective determination within the limits placed on you by the objective technology.
Award-winning writer, producer and director, Brian Gary heads Flying Chaucer Films LLC in Los Angeles and Flying Chaucer Productions LLC in New Orleans. Under those shingles, the multi-hyphenate Gary, creates a wide array of content for commercial, television, theatrical release and the Web. Gary's education includes the Actors Studio MFA program in New York City. Accomplished editor rounds out his filmmaker's skill-set and always on the cutting edge of technology, Brian Gary tours globally speaking to an audience of Final Cut Pro editors. In 2005, he joined forces with Sennet/Sheftell Entertainment, where he infuses the company with tech-savvy entertainment industry experience and acumen. In addition, Brian has a DVD tutorial, The Art of Encoding with Compressor from Ripple Training and is the author of the Apple Pro Training Compressor Quick Reference Guide Apple Pro Training Series.
copyright © www.kenstone.net 2006
© 2000 -2006 Apple Computer, Inc. All rights reserved. Apple, the Apple logo, Final Cut Pro, Macintosh and Power Mac
are either registered trademarks or trademarks of Apple. Other company and product names may be trademarks of their respective owners.All screen captures, images, and textual references are the property and trademark of their creators/owners/publishers.